How to Turn Wi-Fi On or Off With a Keyboard or Desktop Shortcut in Windows
Some laptops come with “Wi-Fi” function keys or switches that can quickly enable or disable your Wi-Fi. If your PC doesn’t have one of these, though, you can make one with the tools built into Windows.
You’ll need to start by creating a desktop or start menu shortcut. Once you’ve done that, you can invoke it with a keyboard shortcut, if you like.
Step One: Find the Name of Your Wi-Fi Connection
First, you’ll need to check the name of your Wi-Fi connection. You’ll need this to write the commands that enable and disable the Wi-Fi connection.
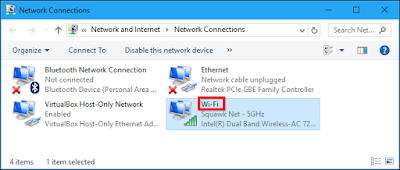
Head to Control Panel > Network and Internet > Network and Sharing Center > Change Adapter Settings.
Note the name of the Wi-Fi connection you want to disable. In the screenshot below, the name of the connection is “Wi-Fi”.
Step Two: Create the Desktop Shortcuts
Now that you know the name of the connection, you can create the desktop shortcuts you need. Right-click the Windows desktop and select New > Shortcut to create a shortcut.
Copy and paste the following line into the the “Type the location of the item” box:
netsh interface set interface name="Wi-Fi" admin = disabled
Replace
Wi-Fi in the command with the name of your Wi-Fi connection.
Name the shortcut “Disable Wi-Fi” or something similar and click “Finish”.
Now, we’ll create an Enable Wi-FI shortcut. Right-click the desktop and select New > Shortcut to create a new shortcut.
Copy and paste the following command into the “Type the location of the item” box, replacing
Wi-Fi with the name of your Wi-Fi connection.netsh interface set interface name="Wi-Fi" admin = enabled
Name the shortcut “Enable Wi-Fi” or something similar and click “Finish”.
Step Three: Make the Desktop Shortcuts Run as Administrator
The netsh command we’re using needs Administrator access to make this change to your system. We’ll need to make these shortcuts run as Administrator.
To do so, right-click one of the shortcuts and select “Properties”.
Click the “Advanced” button on the Shortcut tab, enable the “Run as Administrator” option, and click “OK” twice.
Step Four (Optional): Assign Keyboard Shortcuts
You can now assign a keyboard shortcut, if you like. Right-click one of the shortcuts and select “Properties”.
On the Shortcut tab, click the “Shortcut Key” box and press the key or combination of keys you want to assign to the shortcut. Click “OK” afterwards.
For example, if you want to assign the Ctrl+Alt+F1 keyboard shortcut, click the “Shortcut Key” box and then press Ctrl+Alt+F1.
Repeat this process for the second shortcut, assigning whichever keyboard shortcut you want to it. For example, you could assign Ctrl+Alt+F1 to disable your Wi-Fi and Ctrl+Alt+F2 to enable your Wi-Fi.


Comments
Post a Comment